Property Groups
Use Property Groups so that you can view performance data for combinations of multiple properties, for example all properties in a specific city. You can use these groups in Information Manager, At a Glance dashboard, and in Group Pricing Evaluations.
Property Groups are user-specific, only you see the ones that you created.
You can build Property Groups using one of two methods:
- Manually add properties to a static group.
- Create a rule-based group to which G3 RMS will assign existing or new properties that meet your group criteria.
Using Features in Property Group Views
System Date
When you are viewing a Property Group, the System Date is the earliest date for the property that is the furthest behind the others for data transfer. This point in time is used to summarize the information on the At a Glance Dashboard for Property Groups.
Information Manager
When you view the Information Manager tab by a Property Group, it displays the Alerts, Exceptions and Notifications for all the properties assigned to that group. The items listed on each tab are sorted by score, not by property, so the most critical issues can be reviewed first.
The green numbers in brackets that display on the Information Manager tabs indicate the total number of new Alerts, Exceptions and Notifications that you have not reviewed for all properties in the Property Group.
At a Glance Dashboard
When you choose a Property Group view for the At a Glance Dashboard, it displays a summation of the values for all properties in that group.
- Occupancy percentages and Occupancy display for the combined inventory
- Revenue figures are a sum for all properties
- ADR values are based on combined figures
In the Occupancy and Revenue chart, click the filter icon ![]() to select On Books or Forecast data for a specific Property Business View.
to select On Books or Forecast data for a specific Property Business View.
Group Pricing Evaluation
While you are viewing a Property Group, you can use the New Evaluation option in Group Evaluations to enter details about a potential group booking and generate a group pricing evaluation. In addition to the information that an evaluation provides to help you make a decision about accepting the group, G3 RMS shows you the property that will generate the highest net profit from the group. The system also provides the optimal rate, the break even (or walk-away) rate and the impact that accepting the group will have on forecasted business for all evaluated properties.
Preferences
In your Preferences, you have three options to control your default views for Information Manager, the At a Glance Dashboard and Group Pricing Evaluations. You can set your default view so the Property Group view is available in these locations when you sign in:
- Select a Default Property for the single property view.
- Select a Default Property Group for the Property Group view.
- In the Multi Property Screen Default setting, choose whether the individual Property or Property Group view is your default display when you sign in.
Switching to a Property Group View
Use the property menu in the center of the Information Manager
- Click the down arrow on the right side of the property menu.

- Click Group
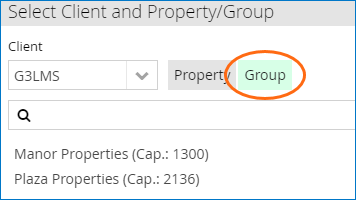
- Click the name of the property group to view.
Setting Up Property Groups
Adding a Property Group
- Click
 , then Property, and then Property Groups.
 - Click the add icon
 .
. - Enter a Group Name.
- Enter a Group Description. Descriptions are used only for informational purposes to help you remember the details of the Property Group.
- If this group should be the default display in Property Group Views, select the Set as
Default Property Group checkbox. The default Property Group is flagged with a green check icon
 after you save it.
 - Locate the properties to be assigned to the new Property Group. If you have only a few properties, you can pick from the complete list. If you have many properties, use the filters to limit the number that are listed:
- Click Show All Properties to list all properties.
- Click Filter Properties to enable filters to enter property details:
- Click the add icon
 .
. - In the first drop-down menu, select a Property Attribute.
- In the second menu, select a qualifier. Equals filters for properties that meet the property value selected in the third menu. Does Not Equal filters for properties that do not meet the value.
- In the third menu, select a property value. These values are defined in Property Attributes.
- If you need to add another row of filters, select And or Or
from the last menu, and click the add icon .
- Continue adding filters as needed to define the desired properties.
- Click the filter icon
 .
A list of properties that meet your criteria display
in the Properties Filtered
pane.
.
A list of properties that meet your criteria display
in the Properties Filtered
pane.
- Click the add icon
- In the Properties Available pane, select properties to add to the Property Group. Press Ctrl+click to select multiple properties.
- Click > to move the selected properties to the Properties Selected pane, or click >> to add all the properties. The number of properties that you can add to a group cannot exceed the maximum defined in your setup.
- Click Save. The new Property Group appears in the list of Property Groups in the left pane. The number of properties assigned to the group displays after the name.
- To continue adding Property Groups, click the add icon in the left pane to clear the fields and begin a new group.
Adding a Rule-Based Property Group
You can use the filter criteria in Property Groups to create a rule-based Property Group. When G3 RMS identified new properties meet the Property Group's defined criteria, the system will add them to the Property Group.
- Click , then Property, and then Property Groups.
- Click the add icon .
- Enter a Group Name.
- Enter a Group Description. Descriptions are used only for informational purposes to help you remember the details of the Property Group.
- If this group should be the default display in Property Group Views, select the Set as
Default Property Group checkbox. The default Property Group is flagged with a green check icon after you save it.
- Use the filters to set the rules for the properties to add to the Property Group:
- Click the add icon .
- In the first drop-down menu, select a Property Attribute.
- In the second menu, select a qualifier. Equals filters for properties that meet the property value selected in the third menu. Does Not Equal filters for properties that do not meet the value.
- In the third menu, select a property value. These values are defined in Property Attributes.
- If you need to add another row of filters, select And or Or
from the last menu, and click the add icon .
- Continue adding filters as needed to locate the desired properties.
- Click the filter icon .
A list of properties that meet your criteria display in the Properties Filtered pane.
- Select the Make this filter a rule checkbox. The filtered properties move to the Properties Selected column. The number of properties that you can add to a group cannot exceed the maximum defined in your setup.
- Click Save. The new Property Group appears in the List of Property Groups. The new Property Group appears in the list of Property Groups in the left pane. The number of properties assigned to the group displays after the name.
- To continue adding Property Groups, click the add icon in the left pane to clear the fields and begin a new group.
Editing a Static Property Group
- Click , then Property, and then Property Groups.
- Filter the Property Groups by typing a string of characters from the name in the Search field in the left pane.
- Select the group title from the list of Property Groups in the left pane.
- Edit the Group Name, if needed.
- Edit the Group Description, if needed.
- Change the Set as Default Property
Group checkbox selection, if needed. The default Property Group is flagged with a green check icon and displays by default in Property Group Views.
- To change the properties assigned to the new Property Group:
- Click Show All Properties to list all properties, or click Filter Properties to expand a set of filters to enter property details. See Add Property Groups to learn how to use property filters. The properties that meet your criteria display in the Properties Available pane.
- To add a property to the group, select the property title and click >. The property will move to the Properties Selected pane.
- To remove a property, select the property title in the Properties Selected pane and click <.
- Click Save.
Editing a Rule-Based Property Group
To change the properties assigned to a rule-based Property Group, you must first turn off the Make this filter a rule setting.
- Click , then Property, and then Property Groups.
- Click the add icon .
- Filter the Property Groups by typing a string of characters from the name in the Search field in the left pane.
- Select the group title from the list of Property Groups in the left pane.
- Edit the Group Name, if needed.
- Edit the Group Description, if needed.
- Change the Set as Default Property
Group checkbox selection, if needed. The default Property Group is flagged with a green check icon
 and displays by default in Property Group Views.
 - Change the properties assigned to the Property Group:
- Clear the Make this filter a rule checkbox.
- Change the filters that define the rules for the group. See Add Rule-Based Property Groups to learn how to use property filters.
- Click Filter. A list of properties that meet your revised criteria display in the Properties Filtered pane.
- Re-select the Make this filter a rule checkbox. The filtered properties move to the Properties Selected column.
- Click Save.